


A common question that I receive is, "How do I track my milling bur lifespan?'' There is no greater annoyance than having chipped margins due to dull burs and not being able to predict when it will happen. Luckily, Roland DG has a quick and easy solution for keeping track of this for you! The following tutorial below is shown using the DWX-51D VPanel, but these steps can also be applied to the Legacy DWX-50 dental mill.
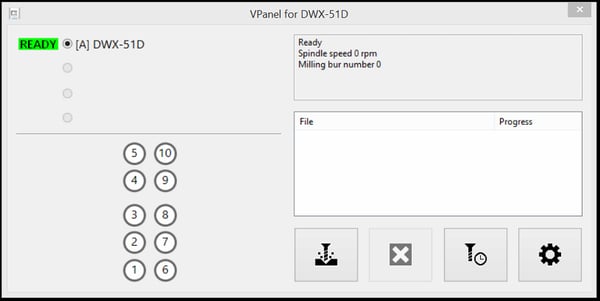
Step 1- Locate and Open VPanel
If you are not familiar with the Roland DG Dental Milling Machines, the VPanel (Virtual Machine Panel) is a control panel that allows the users to automatically run milling calculations, perform diagnostics, and even calibrate the mill.
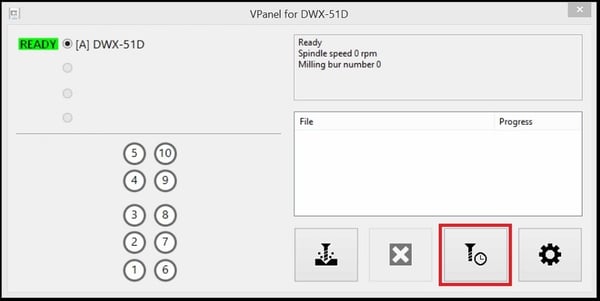
Step 2- Open the Milling Bur Management Application and Register Burs
The bur management application is located on the VPanel and is highlighted in red below.
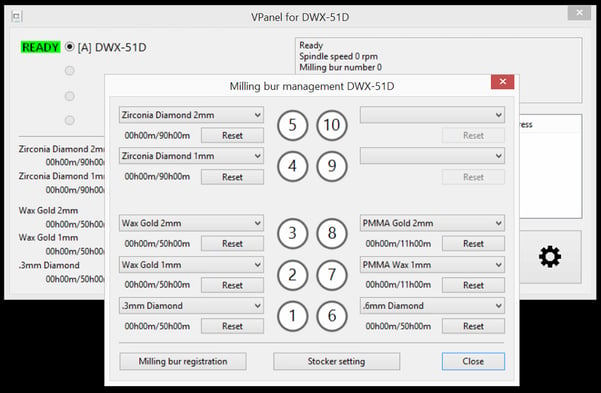
The Roland DG DWX-51D has a total of 10 bur slots available allowing the user to seamlessly switch between materials without swapping burs. With the milling bur management application open, we need to register the burs that you are using. Please select "Milling bur registration" on the bottom of the bur management application.
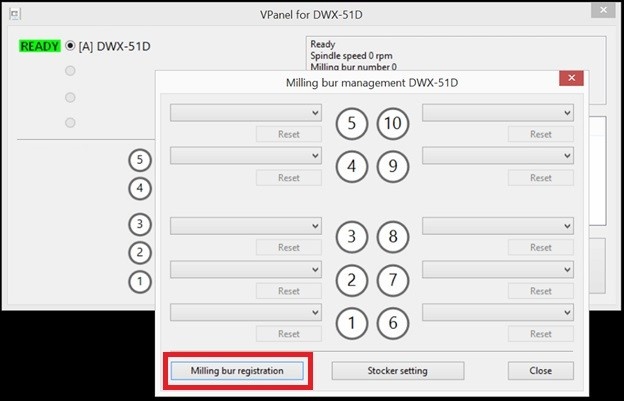
Within the bur registration page, you will notice that there are already tools registered. These are Roland DG generic tools, and will need to be removed to avoid confusion. To register new tools, go ahead and select the "add milling bur" button; fill out the milling bur information, and then select save.
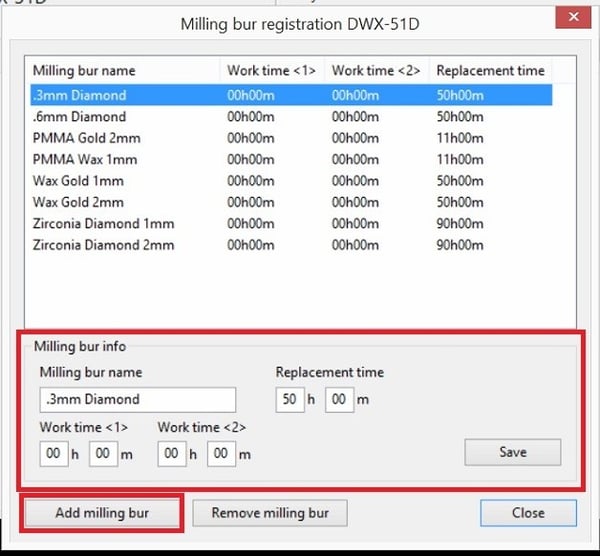
The lifespan of the cutting burs are all dependent on type of cutting bur (diamond or gold) and brand of material that you are using. The best way to calculate bur life is by setting the tool at the maximum hours, and then recording the hours when there is noticeable defects to the surface quality. For Example, if I am milling zirconia and I notice that my margins are chipping at a bur life of 91 hours and 32 minutes, I would then set my bur lifespan at 90 hours. After all of the burs are registered for the materials that are being milled, go ahead and close out of bur registration.
Step 3- Update Bur Management
With the Whip Mix Milling Strategy, the bur slots are material specific. Zirconia cutting burs are in slots #5 (2mm) and #4 (1mm). Wax cutting burs are in slots #3 (2mm) and #2 (1mm). PMMA/Peek cutting burs are in slots #8 (2mm) and #7 (1mm). The #1 and #6 slots are used on all materials, offering the higher detailed burs at .3mm (slot #1) and .6mm (slot #6). Slot #10 is used for holding the detection pin for calibration and the #9 slot is left blank.

By following the order above you can successfully place the correct burs into the correct bur timeclock. When finished, go ahead and select close and the VPanel will now record your bur life, helping you predict when you will need replacements!


Leave a comment