

.jpg)
Digital technology has stepped up its game in the removable arena. As a removable lab looking to go digital, it can be both exciting and intimidating. Let’s take a look at two areas – RPD’s and Full Dentures.
With RPD framework design software options, such as 3Shape, you have a few options to get to the end result:
- Additive manufacturing: utilizes a laser to fuse cobalt powder and allows you to shift from a production timeline of two to three weeks down to two to three days. Aside from offering a shorter production time you can also achieve lower costs in conjunction with high quality. According to a study published in the Journal of Advanced Prosthodontics the “Dimensional accuracy, surface roughness and repeatability of metal 3D printing processes are within the required clinical guidelines of these prosthetics.”
- Milled polymer: Solvay offers their Ultaire™ AKP, an innovative milled high-performance polymer that is milled from Dentivera™ discs. This is a metal-free solution that is biocompatible, lightweight, taste-free, non-corrosive, non-toxic and non-irritating according to Solvay’s website.
- 3D Printing: Design your RPD and send your file to a 3D printer such as an Asiga, EnvisionTec, Stratasys or Bego. Once the pattern is printed in resin, you can traditionally invest and cast your framework.
Moving from traditional dentures to digital dentures
When it comes to using digital technology for Full Dentures you can actually retire the wax spatula and bunsen burner for the most part. Using software like 3Shape's Full Denture module, you can design the set up occlusal plane and select the teeth from the smile library in perfect occlusion. Using Smile Composer you can easily make adjustments as needed. Once you have the teeth in position you can automatically generate gingiva and refine the gingiva look using the sculpt tool kit. From there you prepare the file for manufacturing.
From Digital Design to 3D Printing
Once you digitally design the denture, you will import your .stl file to your 3D printer and print the try in. Typically you will want to print this in a tooth colored or white resin. You can add some pink wax to the anterior region to give the try-in a more natural look. Keep in mind when doing a milled or printed try-in you will want to provide a check-bite so not only can the try-in be scanned but the relationship record verified. The doctor can make adjustments on the try-in by grinding on it or using a composite material to make additions. Once you get the try-in back, you re-scan and make the adjustments to the teeth accordingly. From there you can either 3D print your base or mill it.
You have a few options regarding the teeth:
- Order cards of the teeth you selected from your digital tooth library and bond them into the sockets with a cold cure acrylic.
- Use a monolithic disc for milling, such as AvaDent’s XCL material.
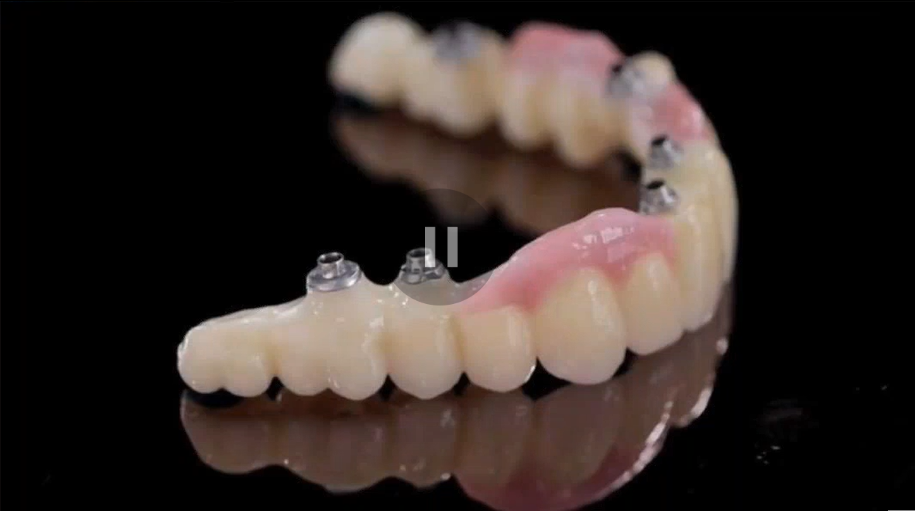
- 3D print the full arch with a tooth colored resin, such as NextDents C&B MFH resin, to bond into the base. The advantage to 3D printing a full arch is the insurance that a tooth will not pop out of the base as the entire arch is fully anchored.
Digital Technology and the Removable Lab
Digital technology has been present in the fixed lab for many years and has slowly migrated into the removable lab. One of the trends I have noticed is that more and more removable labs are finding digital technology as a gateway to becoming a full service lab. Once a removable lab invests in digital technology to design RPD’s or full dentures, they are equipped with the technology to design fixed restorations as well.
As a removable technician, you understand anatomy, morphology, plane of occlusion, curve of spee and so on. This skill set is the foundation of what is needed to digitally design a fixed full-contour restoration. You have many options regarding tooth libraries to choose from to find the most natural tooth selection for each case that you are working on. Once that selection is made, you digitally place the tooth just as you would when setting teeth for a removable denture. Check your contacts, position, occlusion, margin line and save.
Milling, sintering and shading is a whole other ball of wax that removable technicians may not be familiar with. I have seen some removable labs stop after the design process and outsource their fixed restorations for completion. Others have either learned the process or hired an experienced fixed technician to take it from milled to shaded, sintered, stained and glazed.
To take that leap into finishing the process in-house vs outsourcing, it would cost at least another $40,000 for a 5-axis mill, software, dedicated vacuum and sintering oven. However, this doesn’t include the other things you will need such as a porcelain oven, coloring system, and finishing tools.


Leave a comment