


The following are step-by-step procedures for fabricating crown and bridge working models with sectioned, removable dies using the MainStay Dowel Pin System.
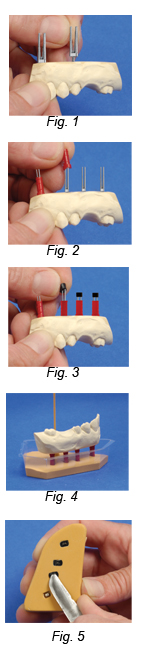
1. Mark the model where pins are to be positioned and drill holes. Note: Proper pin seating requires a recessed drilled hole, (Whip Mix) MainStay Drill is recommended. For Quadrant Models, stagger the drill holes for better stability.
2. Apply MainStay Glue to the knurled head of the pins and insert into the drilled holes (Fig. 1). Place the flat side of the pin at a 45° angle to the buccal wall. Note: Pins should seat in drilled hole so that collar is flush with the base model. Remove excess glue.
3. Slide the red protective sleeves onto pins, seating flush against the model (Fig. 2).
4. Place end caps on the pin ends (Fig. 3), and apply gypsum separator to the bottom of the model.
5. Place the pinned model in the base former (Fig. 4), and pour in a FlowStone (Whip Mix) base stone. Note: Vacuum mixing (Whip Mix Vacuum Power Mixer) is recommended, do not vibrate stone after mixing.
Once the stone base is set, remove the base former, and insert the tip of the lab knife into the slit of the exposed end cap, and remove (Fig. 5).
Fig. 6 shows the single pin with rectangular blade design that eliminates rotation (top); the ribbed plastic sleeve holds tightly in the base while the pin removes easily. The space between the sleeve and the end cap establishes metal-to-stone contact, providing additional stability (center); a rubber end cap helps stabilize quadrants and eliminates use of a bur to find the pin.
Fig. 7 shows how the pin design, with the protective end cap, creates a solid foundation for fabrication of fixed crown and bridge restorations.


Leave a comment